编者按:SDNLAB有一篇文章《OpenDaylight VTN 简单介绍及部署》谈到了VTN的基本概念和在ubuntu系统中安装VTN coordinator的方法。

本文接着上一篇主要谈四个方面:
1:在centos 64位系统安装VTN coordinator
2:使用VTN的创建虚拟网,并进行验证
3:VTN项目开发环境的搭建。
4:VTN的观察和类似商业部署。
一:在centos 64位系统安装VTN coordinator
1:VTN Coordinator在opendaylightKaraf版本的的externalapps目录下,这个版本没必要再单独安装VTN manager。VTN coordinator安装环境主要适用于RHEL 6 (x86_64),CentOS 6 (x86_64),Fedora 20 (x86_64),Fedora 19 (x86_64)四种。本文使用的环境是Centos 6.6 64bit环境;
1:导出distribution.vtn-coordinator-6.0.0.1-Helium-bin.tar.bz2到/usr/local/vtn目录下;
|
1 |
tar -C / -xvjf \distribution.vtn-coordinator-6.0.0.1-Helium-bin.tar.bz2 |
2:安装JDK:yum install java-1.7.0-openjdk-devel
3:安装必备的条件:
|
1 2 3 4 |
yum install perl-Digest-SHA uuidlibxsltlibcurlunixODBC wget http://dl.fedoraproject.org/pub/epel/6/i386/epel-release-6-8.noarch.rpm rpm -Uvh epel-release-6-8.noarch.rpm yum install json-c |
4:安装Postgresql数据库
配置yum资源库下载最新的rpm为PostgreSQL 9.1;
|
1 |
rpm -ivh http://yum.postgresql.org/9.1/redhat/rhel-6-x86_64/pgdg-redhat91-9.1-5.noarch.rpm |
安装必备的PostgreSQL包:
|
1 2 |
yum install postgresql91-libs postgresql91 postgresql91-server \ postgresql91-contrib postgresql91-odbc |
注:postgres版本>=9.1,且如果在安装过程中遇到问题,请参考
https://wiki.opendaylight.org/view/OpenDaylight_Virtual_Tenant_Network_(VTN):Installation:Troubleshooting#Problems_while_Installing_PostgreSQL_due_to_openssl
5:为VTN coordinator配置数据库
|
1 |
/usr/local/vtn/sbin/db_setup |
6:开启VTN coordinator
|
1 |
/usr/local/vtn/bin/vtn_start |
7:测试VTN coordinato
7.1运行opendaylight控制器
|
1 |
bin/karaf |
7.2安装VTN Manager and OpenFlow plugin功能
|
1 |
feature:installodl-vtn-manager-all odl-openflowplugin-all odl-adsal-compatibility-all |
7.3验证是否安装成功
|
1 2 3 4 |
curl --user admin:adminpass -H 'content-type: application/json' -X GET -H 'ipaddr:127.0.0.1' \ http://<VTN_COORDINATOR_IP_ADDRESS>:<VTN_COORDINATOR_PORT>/vtn-webapi/ api_version.json` |
返回:{"api_version":{"version":"VX.X"}},表示安装成功。
7.4关闭VTN coordinator
|
1 |
/usr/local/vtn/bin/vtn_stop |
二:使用VTN的创建虚拟网,并进行验证
以port maping为例对虚拟网进行搭建测试
1:创建一个控制器
|
1 |
curl --user admin:adminpass -H 'content-type: application/json' -X POST -d '{"controller": {"controller_id": "controllerone", "ipaddr":"控制器的IP地址", "type": "odc", "version": "1.0", "auditstatus":"enable"}}' |
//查询这个控制器:
|
1 |
curl -v --user admin:adminpass 'content-type: application/json' -X GET http://127.0.0.1:8083/vtn-webapi/controllers/controllerone |
//查询控制器列表:
|
1 |
curl -v --user admin:adminpass 'content-type: application/json' -X GET http://127.0.0.1:8083/vtn-webapi/controllers/controllerone/detail |
注意:当返回operstatus为up的时候,表示创建成功,如果为down,可关闭防火墙再试。
2:创建一个虚拟网
|
1 |
curl --user admin:adminpass -H 'content-type: application/json' -X POST -d '{"vtn" : {"vtn_name":"vtn1","description":"test VTN" }}' http://127.0.0.1:8083/vtn-webapi/vtns.json |
//查询这个虚拟网:
|
1 |
curl -v --user admin:adminpass -H 'content-ty pe: application/json' -H 'ipaddr:127.0.0.1' -X POST -d '{"vtn" : {"vtn_name":"vtn1","description":"test VTN" }}' http://127.0.0.1:8083/vtn-webapi/vtns.json |
//查询虚拟网列表:
|
1 |
curl -v --user admin:adminpass -H 'content-type: application/json' -X GET http://127.0.0.1:8083/vtn-webapi/vtns |
3:在VTN里面创建一个虚拟网桥
|
1 2 |
curl --user admin:adminpass -H 'content-type: application/json' -X POST -d '{"vbridge" : {"vbr_name":"vBridge1","controller_id":"controllerone","domain_id":"(DEFAULT)" }}' http://127.0.0.1:8083/vtn-webapi/vtns/vtn1/vbridges.json |
// 查询这个虚拟网桥
|
1 2 |
curl -v --user admin:adminpass -H 'content-type: application/json' -H 'ipaddr:127.0.0.1' -X POST -d '{"vbridge" : {"vbr_name":"vBridge1","controller_id":"controllerone","domain_id":"(DEFAULT)" }}' http://127.0.0.1:8083/vtn-webapi/vtns/vtn1/vbridges.json |
4:在虚拟网桥里面创建两个虚拟接口:
|
1 |
curl --user admin:adminpass -H 'content-type: application/json' -X POST -d '{"interface": {"if_name": "if1","description": "if_desc1"}}' http://127.0.0.1:8083/vtn-webapi/vtns/vtn1/vbridges/vBridge1/interfaces.json |
|
1 |
curl --user admin:adminpass -H 'content-type: application/json' -X POST -d '{"interface": {"if_name": "if2","description": "if_desc2"}}' http://127.0.0.1:8083/vtn-webapi/vtns/vtn1/vbridges/vBridge1/interfaces.json |
5:获取可配置的逻辑端口号:
|
1 |
curl --user admin:adminpass -H 'content-type: application/json' -X GET http://127.0.0.1:8083/vtn-webapi/controllers/controllerone/domains/\(DEFAULT\)/logical_ports.json |
//主要是为了方便下一步
5:在两个虚拟接口上配置端口映射
|
1 |
curl --user admin:adminpass -H 'content-type: application/json' -X PUT -d '{"portmap":{"logical_port_id": "PP-OF:00:00:00:00:00:00:00:03-s3-eth1"}}' http://127.0.0.1:8083/vtn-webapi/vtns/vtn1/vbridges/vBridge1/interfaces/if1/portmap.json |
|
1 |
curl --user admin:adminpass -H 'content-type: application/json' -X PUT -d '{"portmap":{"logical_port_id": "PP-OF:00:00:00:00:00:00:00:02-s2-eth1"}}' http://127.0.0.1:8083/vtn-webapi/vtns/vtn1/vbridges/vBridge1/interfaces/if2/portmap.json |
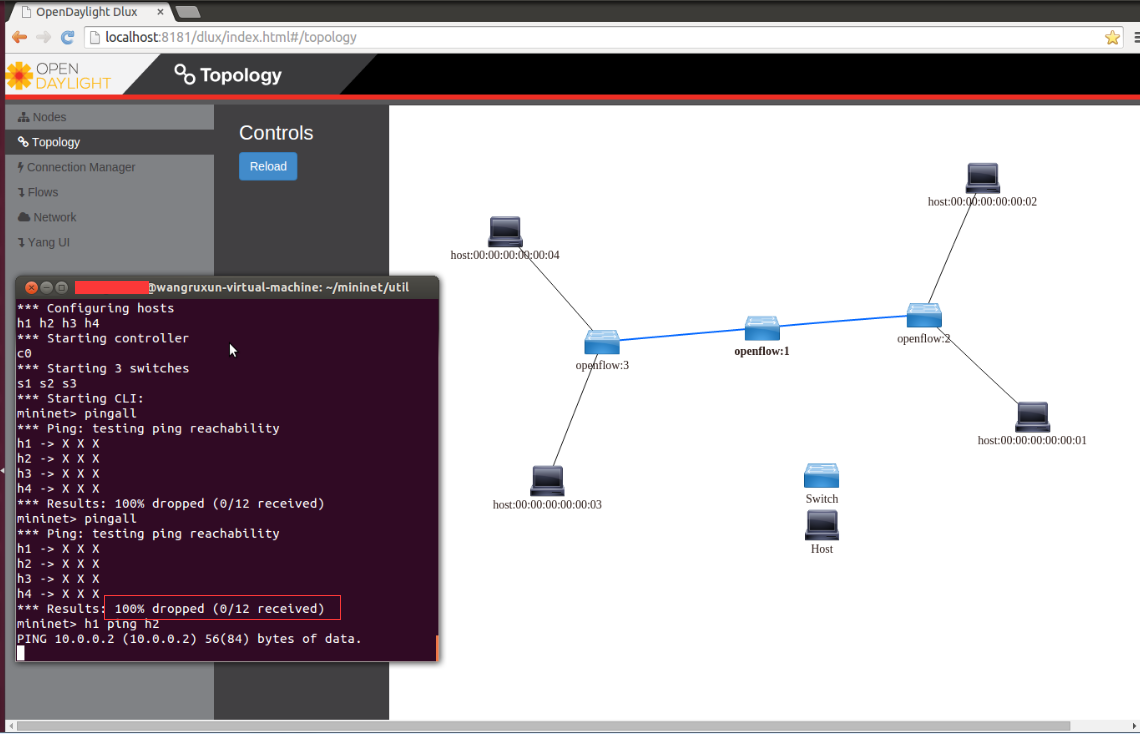
6:验证:如果ping通,代表虚拟网创建成功。
mininet> h1 ping h3
7:一些验证截图:
7.1:启动控制器,还没有创建虚拟网时候是ping不通的,这是安装VTN manager导致的。
7.2启动VTN coordinator:


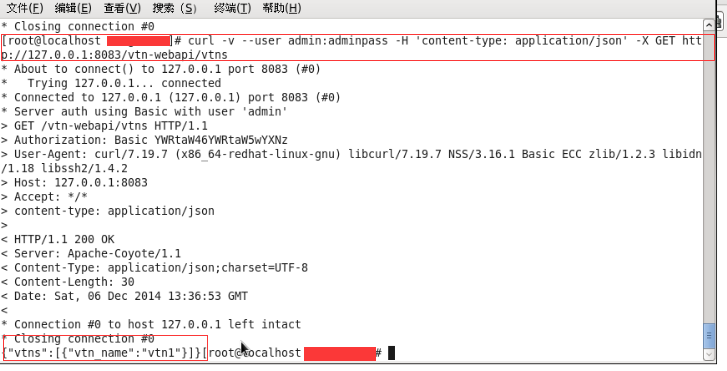
7.3:获取创建的VTN信息:
|
1 |
curl -v --user admin:adminpass -H 'content-type: application/json' -X GET http://127.0.0.1:8083/vtn-webapi/vtns |
7.4:获取交换机信息
|
1 |
curl -v --user admin:adminpass -H 'content-type: application/json' -X GET -H ipaddr 127.0.0.1 |
http://127.0.0.1:8083/vtn-webapi/controllers/controllerone/switches/detail

7.5;进行虚拟网映射之后h1和h3是可以ping通的

7.6:VTN除了对单个控制器进行控制外,还可以对多个控制器进行控制,下图展示的就是两个控制器的情

三:VTN项目开发环境的搭建与部署。
首先下载VTN源码:
|
1 |
git clone https://git.opendaylight.org/gerrit/p/vtn.git |
3.1:VTN manager开发环境搭建与部署
对VTN的源码的manager目录下进行如下操作:
|
1 |
mvn clean install –DskipTests |
下图是对VTN manager构建成功的情形:

修改VTN manager代码主要有两种办法:
第一种是运行VTN manager:
|
1 2 |
cd ${VTN_DIR}/manager/dist-karaf/target/assembly ./bin/karaf |
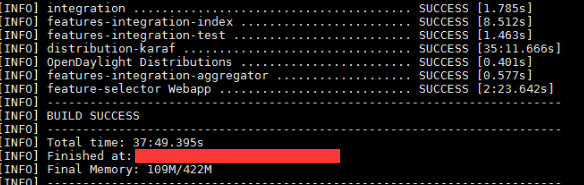
第二种是:修改完VTN manager后,对integration项目(git clone https://git.opendaylight.org/gerrit/p/integration.git),(此项目包含了其他所有的子项目)的根目录进行:
|
1 |
mvn clean install –DskipTests |
下图为对integration进行构建成功的情形。
然后在bin目录启动控制器即可。
3.2:VTN coordinator开发环境搭建与部署
|
1 2 3 |
cd vtn/coordinator mvn -f dist/pom.xml install tar -C/ -jxvf dist/target/distribution.vtn-coordinator-6.1.0.0-SNAPSHOT-bin.tar.bz2 |
VTN coordinator包含perl,C++,Java三种语言,有单独的数据库,建议在redhat 64bit环境进行。
四:VTN的观察和类似商业部署
VTN的技术应该来源于日本NEC的产品PF6800;NEC在世界最大的网络计算机大会Interop LasVegas 2014上,其产品“ProgrammableFlow Unified Network Coordinator”获得组委会Management组别评委的青睐,摘得“Best of Interop 2014”奖项。日本名为:UNIVERGE PF6800 Unified Network Coordinator
“Best of Interop 2014”奖项是从9个系列共130多个网络产品中逐一选出,颁布给最具技术影响力的产品。
PF6800具有什么样的能力?
支持10 OpenFlow controllers, 2000 switches, 100,000 VLANs, or 10,000,000 network flows.除此之外提供openstack接口,提供rest api来整合网络第四层到第七层的服务。具备虚拟网故障管理,多控制器灾难恢复能力。
早在2012年日本NEC就部署过实际的VTN应用;有两个ProgrammableFlow controllers 和16个交换机组成。参考网址:https://www.opennetworking.org/component/content/article/48-sdn-resources/sdn-library/customer-case-studies/852-nec
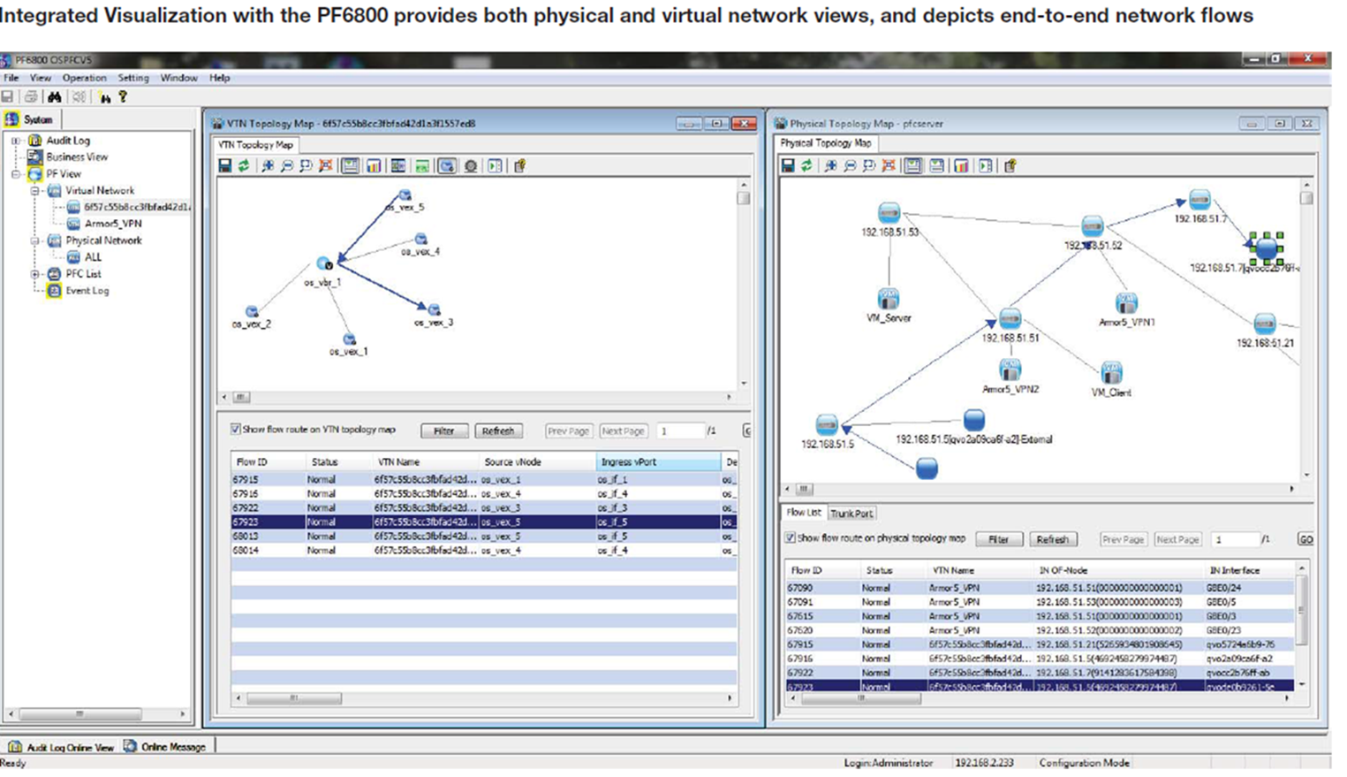
下图是PF6800展示的前端可视化控制系统:
PF6800 已经有几百个商业部署的案例,最近一次,日本西高速铁路也用到了这款商业控制器。关于这款控制器,国外某著名视频网站上有很多介绍。也有VTN负责人工藤雅司的讲解,以及日本人开的各种opendaylight会议,有个外国人做了一个VTN与openstack结合的应用;韩国也有一些人在做VTN与openstack结合的研究。
好了,先简单写到这里,下一次作者会考虑继续写一篇关于VTN的文章,谢谢。
作者简介:
王如迅(OpenDaylight[194240432]@空灵恬静)
北京邮电大学网络技术研究院,网络与交换技术国家重点实验室硕士研究生。