作者简介:万群,Intel 存储软件工程师,主要从事SPDK软件测试工作。
文章转载自DPDK与SPDK开源社区
背景介绍
在之前推送的文章《用SoftRoCE测试SPDK NVMe-oF target》中,我们讨论了在物理机上使用SoftRoCE部署SPDK NVMe-oF的方法。 在今天的文章中,我们将讨论在虚拟机上使用SoftRoCE部署SPDK NVMe-oF的方法。
为什么我们需要在虚拟机上部署SPDK NVMe-oF呢?原因很明显:因为随着主机拥有越来越强大的内核,我们能更有效地利用内核资源;而对于NVMe-oF功能测试用例,不需要太多计算和内存资源,那么,我们可以充分利用虚拟机来进行NVMe-oF功能测试。 接下来,我们将讨论如何使用虚拟机和SoftRoCE来实现此目的。
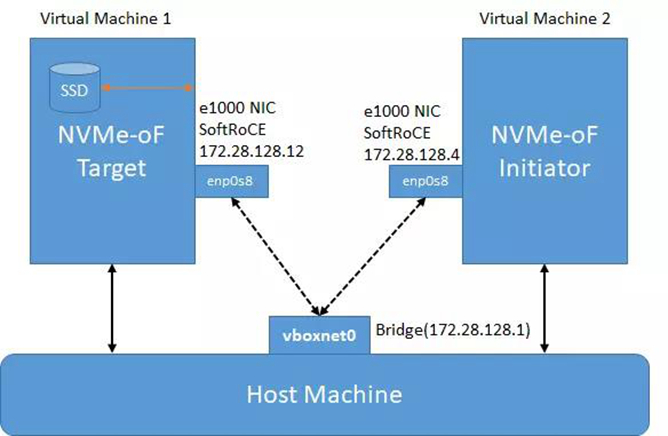
设置SoftRoCE环境
设置两个Fedora26内核为4.15.0-041500-generic的虚拟机。两个虚拟机使用Vagrantfile连接到主机上名为vboxnet0的的网桥。 拓扑结构如下图:
1.在主机中,您可以使用如下vagrant命令列出有效的虚拟机:
|
1 2 3 4 5 |
# vagrant global-status --prune id name provider state directory -------------------------------------------------------------------------- 440cdef sss virtualbox running /home/yidong/spdk_init/scripts/vagrant c5e4e5a www virtualbox running /home/yidong/spdk/scripts/vagrant |
以上显示了有关此计算机上所有已知Vagrant环境的信息。 这是缓存数据,可能不是最新的信息(使用“vagrant global-status —prune”来修剪无效条目)。 要与任何计算机进行交互,您可以转到该目录并运行Vagrant,也可以直接使用任何目录中的Vagrant命令使用该ID。 例如:
|
1 |
"vagrant destroy 1a2b3c4d" |
2.然后,您可以使用以下命令登录虚拟机:
|
1 2 3 4 5 6 7 8 9 10 |
# vagrant ssh 440cdef Welcome to Ubuntu 16.04.4 LTS (GNU/Linux 4.15.0-041500-generic x86_64) * Documentation: https://help.ubuntu.com * Management: https://landscape.canonical.com * Support: https://ubuntu.com/advantage Get cloud support with Ubuntu Advantage Cloud Guest: http://www.ubuntu.com/business/services/cloud 43 packages can be updated. 0 updates are security updates. Last login: Tue Aug 7 01:48:33 2018 from 10.0.2.2 |
3.接下来,您需要按照上一期文章《用SoftRoCE测试SPDK NVMe-oF target》中“配置SoftRoCE环境”部分的命令,安装内核空间驱动程序和用户空间驱动程序[1][2],以便在虚拟机上正确设置SoftRoCE。
使用场景- NVMe-oF
注意:
1.以NVMe-oF为例
2.此处我们使用rdma模式或本地映射模式运行fio、perf
1.使用fio运行NVMe-oF测试的步骤
NVMe-oF target(虚拟机1)
1.克隆最新的SPDK
|
1 |
git clone https://github.com/spdk/spdk.git |
2.使用with rdma编译SPDK
|
1 2 |
./configure --with-rdma make -j 64 |
3.卸载mlx_ib驱动程序并加载NVMe-oF RDMA驱动程序
|
1 2 3 |
modprobe –rv mlx4_ib modprobe nvme_rdma modprobe nvme_fabrics |
4.为非rdma NIC配置SoftRoCE
|
1 2 3 |
rxe_cfg start rxe_cfg add enp0s8 (这里我们使用e1000网卡) ifconfig enp0s8 172.28.128.12 |
5.使用以下命令运行nvmf_tgt应用程序
|
1 2 |
cd spdk ./app/nvmf_tgt/nvmf_tgt -c app/nvmf_tgt/nvmf.conf.in |
以下是nvmf.conf.in 文件,以供参考。
|
1 2 3 4 5 6 7 8 9 10 11 12 13 14 15 16 17 18 |
[Global] [Nvmf] MaxQueuesPerSession 4 AcceptorPollRate 10000 [Nvme] TransportId "trtype:PCIe traddr:0000:0e:00.0" Nvme0 RetryCount 4 Timeout 0 ActionOnTimeout None AdminPollRate 100000 HotplugEnable No [Subsystem1] NQN nqn.2016-06.io.spdk:cnode1 Listen RDMA 172.28.128.12:4420 AllowAnyHost yes Host nqn.2016-06.io.spdk:init SN SPDK00000000000001 Namespace Nvme0n1 |
6.当nvmf_tgt应用程序成功运行时,将看到以下内容
|
1 2 3 4 5 6 7 8 9 10 11 12 13 14 |
# ./app/nvmf_tgt/nvmf_tgt -c ../nvmf.conf Starting SPDK v18.07 / DPDK 18.05.0 initialization... [ DPDK EAL parameters: nvmf -c 0x1 --legacy-mem --file-prefix=spdk_pid5808 ] EAL: Detected 2 lcore(s) EAL: Detected 1 NUMA nodes EAL: Multi-process socket /var/run/dpdk/spdk_pid5808/mp_socket EAL: Probing VFIO support... app.c: 530:spdk_app_start: *NOTICE*: Total cores available: 1 reactor.c: 718:spdk_reactors_init: *NOTICE*: Occupied cpu socket mask is 0x1 reactor.c: 492:_spdk_reactor_run: *NOTICE*: Reactor started on core 0 on socket 0 bdev_nvme.c:1268:bdev_nvme_library_init: *WARNING*: Timeout (in seconds) was renamed to TimeoutUsec (in microseconds) bdev_nvme.c:1269:bdev_nvme_library_init: *WARNING*: Please update your configuration file EAL: PCI device 0000:00:0e.0 on NUMA socket 0 EAL: probe driver: 80ee:4e56 spdk_nvme |
NVMe-oF Initiator (虚拟机2)
1.卸载mlx_ib驱动程序并加载NVMe-oF RDMA主机驱动程序
|
1 2 3 |
modprobe –rv mlx4_ib modprobe nvme_rdma modprobe nvme_fabrics |
2.为非rdma NIC配置SoftRoCE
|
1 2 3 4 |
rxe_cfg start rxe_cfg add enp0s8 (在这里我们使用e1000网卡) ifconfig enp0s8 172.28.128.4 |
3.连接子系统
|
1 |
nvme connect -t rdma -n "nqn.2016-06.io.spdk:cnode1" -a 172.28.128.12 -s 4420 |
4.执行fio任务
|
1 |
fio fio_softroce.job |
Fio配置文件fio_softroce.job如下:
|
1 2 3 4 5 6 7 8 9 10 11 12 13 14 15 |
[global] invalidate=1 norandommap=1 thread=1 rw=randrw runtime=10 ioengine=libaio direct=1 bs=4096 size=1G iodepth=128 group_reporting time_based=1 [job0] filename=/dev/nvme0n1 |
5.当fio成功完成时,您将看到以下内容
|
1 2 3 4 5 6 7 8 9 10 11 12 13 14 15 16 17 18 19 20 21 22 23 24 25 26 27 28 29 30 31 32 33 34 35 36 37 38 39 40 41 42 43 44 45 46 47 |
# fio fio_softroce.job job0: (g=0): rw=randrw, bs=4K-4K/4K-4K/4K-4K, ioengine=libaio, iodepth=128 fio-2.2.10 Starting 1 thread open path: No such file or directory Error getting slave device numbers.: No such file or directory Jobs: 1 (f=1): [m(1)] [1.1% done] [0KB/0KB/0KB /s] [0/0/0 iops] [eta 18m:59s] job0: (groupid=0, jobs=1): err= 0: pid=6477: Tue Aug 7 01:26:12 2018 read : io=6388.0KB, bw=534202B/s, iops=130, runt= 12245msec slat (usec): min=3, max=25613, avg=568.48, stdev=2447.25 clat (usec): min=600, max=2540.4K, avg=40228.82, stdev=227386.16 lat (usec): min=710, max=2557.8K, avg=40797.85, stdev=227690.07 clat percentiles (usec): | 1.00th=[ 964], 5.00th=[ 1336], 10.00th=[ 1656], 20.00th=[ 2160], | 30.00th=[ 2608], 40.00th=[ 5856], 50.00th=[ 9280], 60.00th=[12736], | 70.00th=[15424], 80.00th=[18048], 90.00th=[23936], 95.00th=[30592], | 99.00th=[995328], 99.50th=[2277376], 99.90th=[2473984], 99.95th=[2539520], | 99.99th=[2539520] bw (KB /s): min= 64, max= 3696, per=100.00%, avg=1770.71, stdev=1051.85 write: io=5944.0KB, bw=497072B/s, iops=121, runt= 12245msec slat (usec): min=4, max=23449, avg=656.70, stdev=2460.03 clat (msec): min=3, max=2988, avg=416.84, stdev=605.87 lat (msec): min=3, max=2988, avg=417.50, stdev=605.89 clat percentiles (msec): | 1.00th=[ 7], 5.00th=[ 21], 10.00th=[ 85], 20.00th=[ 119], | 30.00th=[ 151], 40.00th=[ 182], 50.00th=[ 217], 60.00th=[ 265], | 70.00th=[ 334], 80.00th=[ 465], 90.00th=[ 709], 95.00th=[ 2376], | 99.00th=[ 2573], 99.50th=[ 2638], 99.90th=[ 2704], 99.95th=[ 2999], | 99.99th=[ 2999] bw (KB /s): min= 0, max= 2416, per=100.00%, avg=1335.50, stdev=846.13 lat (usec) : 750=0.10%, 1000=0.55% lat (msec) : 2=8.27%, 4=10.12%, 10=8.08%, 20=18.52%, 50=7.82% lat (msec) : 100=3.15%, 250=21.51%, 500=12.81%, 750=3.99%, 1000=0.94% lat (msec) : 2000=0.03%, >=2000=4.12% cpu : usr=0.00%, sys=1.80%, ctx=1999, majf=0, minf=1 IO depths : 1=0.1%, 2=0.1%, 4=0.1%, 8=0.3%, 16=0.5%, 32=1.0%, >=64=98.0% submit : 0=0.0%, 4=100.0%, 8=0.0%, 16=0.0%, 32=0.0%, 64=0.0%, >=64=0.0% complete : 0=0.0%, 4=100.0%, 8=0.0%, 16=0.0%, 32=0.0%, 64=0.0%, >=64=0.1% issued : total=r=1597/w=1486/d=0, short=r=0/w=0/d=0, drop=r=0/w=0/d=0 latency : target=0, window=0, percentile=100.00%, depth=128 Run status group 0 (all jobs): READ: io=6388KB, aggrb=521KB/s, minb=521KB/s, maxb=521KB/s, mint=12245msec, maxt=12245msec WRITE: io=5944KB, aggrb=485KB/s, minb=485KB/s, maxb=485KB/s, mint=12245msec, maxt=12245msec Disk stats (read/write): nvme0n1: ios=0/0, merge=0/0, ticks=0/0, in_queue=0, util=0.00% |
6.断开子系统
|
1 |
nvme disconnect -d /dev/nvme0n1 |
2.在rdma模式下使用perf在NVMe-oF测试上运行的步骤
NVMe-oF Target (虚拟机1)
步骤和fio完全一样。
NVMe-oF Target (虚拟机2)
1.断开现有的nvme设备
|
1 |
nvme disconnect –d /dev/nvme0n1 |
2.使用 setup.sh运行安装程序
|
1 |
./script/setup.sh |
3.使用rdma模式运行perf测试
|
1 |
./examples/nvme/perf/perf –q 1 –w randread –s 4096 –t 10 –r ‘trtype:RDMA adrfam:IPv4 traddr:172.28.128.12 trsvcid:4420’ |
4.当perf成功完成运行后,您将看到打印的内容如下
|
1 2 3 4 5 6 7 8 9 10 11 12 13 14 15 16 17 18 19 |
# ./examples/nvme/perf/perf -q 1 -w randread -s 4096 -t 10 -r 'trtype:RDMA adrfam:IPv4 traddr:172.28.128.12 trsvcid:4420' Starting SPDK v18.10-pre / DPDK 18.05.0 initialization... [ DPDK EAL parameters: perf -c 0x1 --no-pci --legacy-mem --file-prefix=spdk_pid5138 ] EAL: Detected 2 lcore(s) EAL: Detected 1 NUMA nodes EAL: Multi-process socket /var/run/dpdk/spdk_pid5138/mp_socket EAL: Probing VFIO support... Initializing NVMe Controllers Attaching to NVMe over Fabrics controller at 172.28.128.12:4420: nqn.2016-06.io.spdk:cnode1 Attached to NVMe over Fabrics controller at 172.28.128.12:4420: nqn.2016-06.io.spdk:cnode1 Associating SPDK bdev Controller (SPDK00000000000001 ) with lcore 0 Initialization complete. Launching workers. Starting thread on core 0 ======================================================== Latency(us) Device Information : IOPS MB/s Average min max SPDK bdev Controller (SPDK00000000000001 ) from core 0: 3389.30 13.24 294.97 143.31 17376.58 ======================================================== Total : 3389.30 13.24 294.97 143.31 17376.58 |
3.在NVMe-oF测试中使用perf在本地运行的步骤
NVMe-oF Target (虚拟机1)
步骤和fio完全一样。
NVMe-oF Initiator (虚拟机2)
1.连接子系统
|
1 |
nvme connect –t rdma –n “nqn.2016-06.io.spdk:cnode1” –a 172.28.128.12 –s 4420 |
2.列出连接的nvme设备
|
1 |
nvme list |
3.在本地设备上运行perf测试
|
1 |
./examples/nvme/perf/perf /dev/nvme0n1 –q 1 –w randread –s 4096 –t 10 |
4.当perf成功完成运行后,您将看到打印的消息如下
|
1 2 3 4 5 6 7 8 9 10 11 12 13 14 15 16 17 18 19 20 21 22 23 |
# ./examples/nvme/perf/perf /dev/nvme0n1 -q 1 -w randread -s 4096 -t 10 Starting SPDK v18.10-pre / DPDK 18.05.0 initialization... [ DPDK EAL parameters: perf -c 0x1 --legacy-mem --file-prefix=spdk_pid5122 ] EAL: Detected 2 lcore(s) EAL: Detected 1 NUMA nodes EAL: Multi-process socket /var/run/dpdk/spdk_pid5122/mp_socket EAL: Probing VFIO support... Initializing NVMe Controllers EAL: PCI device 0000:00:0e.0 on NUMA socket 0 EAL: probe driver: 80ee:4e56 spdk_nvme Attaching to NVMe Controller at 0000:00:0e.0 Attached to NVMe Controller at 0000:00:0e.0 [80ee:4e56] Associating ORCL-VBOX-NVME-VER12 (VB1234-56789 ) with lcore 0 Associating /dev/nvme0n1 with lcore 0 Initialization complete. Launching workers. Starting thread on core 0 ======================================================== Latency(us) Device Information : IOPS MB/s Average min max /dev/nvme0n1 from core 0: 0.50 0.00 2286420.25 2223980.88 2307051.46 ORCL-VBOX-NVME-VER12 (VB1234-56789 ) from core 0: 11283.60 44.08 101.63 33.21 1474178.36 ======================================================== Total : 11284.10 44.08 202.94 33.21 2307051.46 |
5.断开子系统
|
1 |
nvme disconnect -d /dev/nvme0n1 |
Q & A
1.在NVMe-oF initiator连接到NVMe-oFtarget后,如果使用lsblk命令检查连接的命名空间,您将看到以下内容。您也可以使用nvme list检查命名空间。
|
1 2 3 4 5 6 |
# lsblk lsblk: nvme0c1n1: unknown device name NAME MAJ:MIN RM SIZE RO TYPE MOUNTPOINT sdb 8:16 0 10M 0 disk sda 8:0 0 40G 0 disk └─sda1 8:1 0 40G 0 part / |
2.在NVMe-oF initiator上,如果在使用perf命令“./examples/nvme/perf/perf / dev / nvme0n1 -q 1 -s 4096 -w randread -t 10”运行时遇到以下问题,您可以重新启动虚拟机,此问题将得到解决。
|
1 2 3 4 5 6 7 8 9 10 |
# ./examples/nvme/perf/perf /dev/nvme0n1 -q 1 -s 4096 -w randread -t 10 Starting SPDK v18.07-pre / DPDK 18.02.0 initialization... [ DPDK EAL parameters: perf -c 0x1 --file-prefix=spdk_pid8197 ] EAL: Detected 2 lcore(s) EAL: No free hugepages reported in hugepages-2048kB EAL: FATAL: Cannot get hugepage information. EAL: Cannot get hugepage information. Failed to initialize DPDK Unable to initialize SPDK env ./examples/nvme/perf/perf: errors occured |
参考文献
[1] https://community.mellanox.com/docs/DOC-2184
[2] https://github.com/SoftRoCE