前言
本文在前面安装篇的基础上,对其功能进行应用实践。本文先介绍使用中的一些注意事项,后面介绍其网络接口相关的功能。

探索开始
这款操作系统目的是为了在x86平台上,实现交换机、路由、防火墙等功能。在Vyatta被博科收购后,社区推出了这个开源的fork。令笔者很好奇的是,似乎Vyatta/VyOS在日本挺受青睐,在日本亚马逊可以看到11年和14年出版的两本介绍Vyatta的书,因为VyOS是一个fork,大概在操作上基本一致。
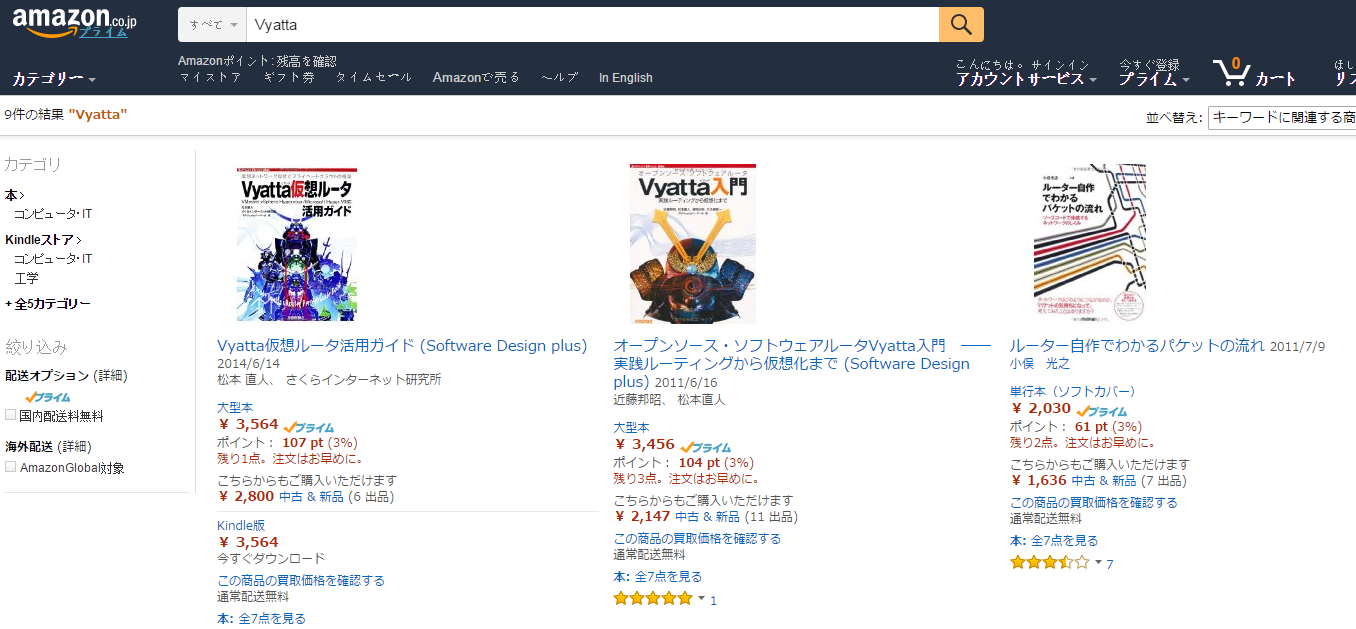
3000日元折合人民币大概是168-170人民币左右(日本书贵)
分析
为了支持通过串口或usb访问VyOS,VyOS还提供了三种console:
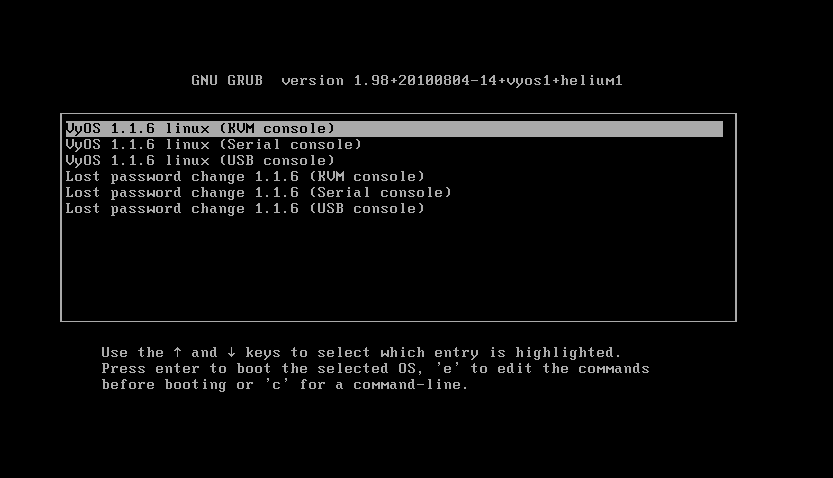
由于笔者环境限制,只能在虚拟机上测试,选择默认的KVM console即可。
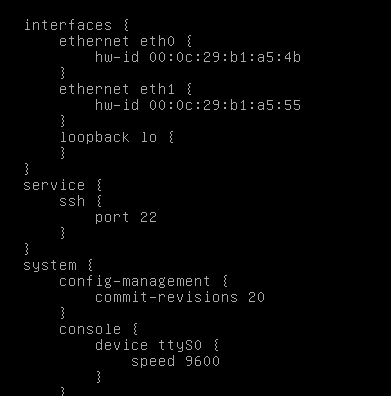
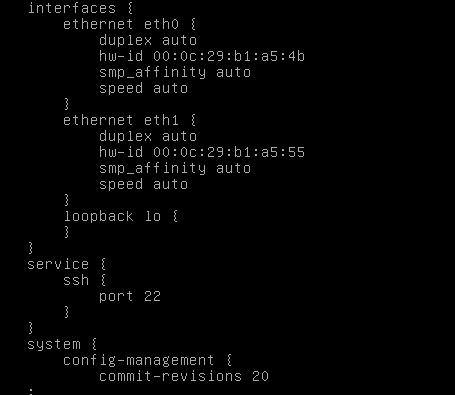
登陆到VyOS后,可以输入show configuration查看目前系统的配置信息:
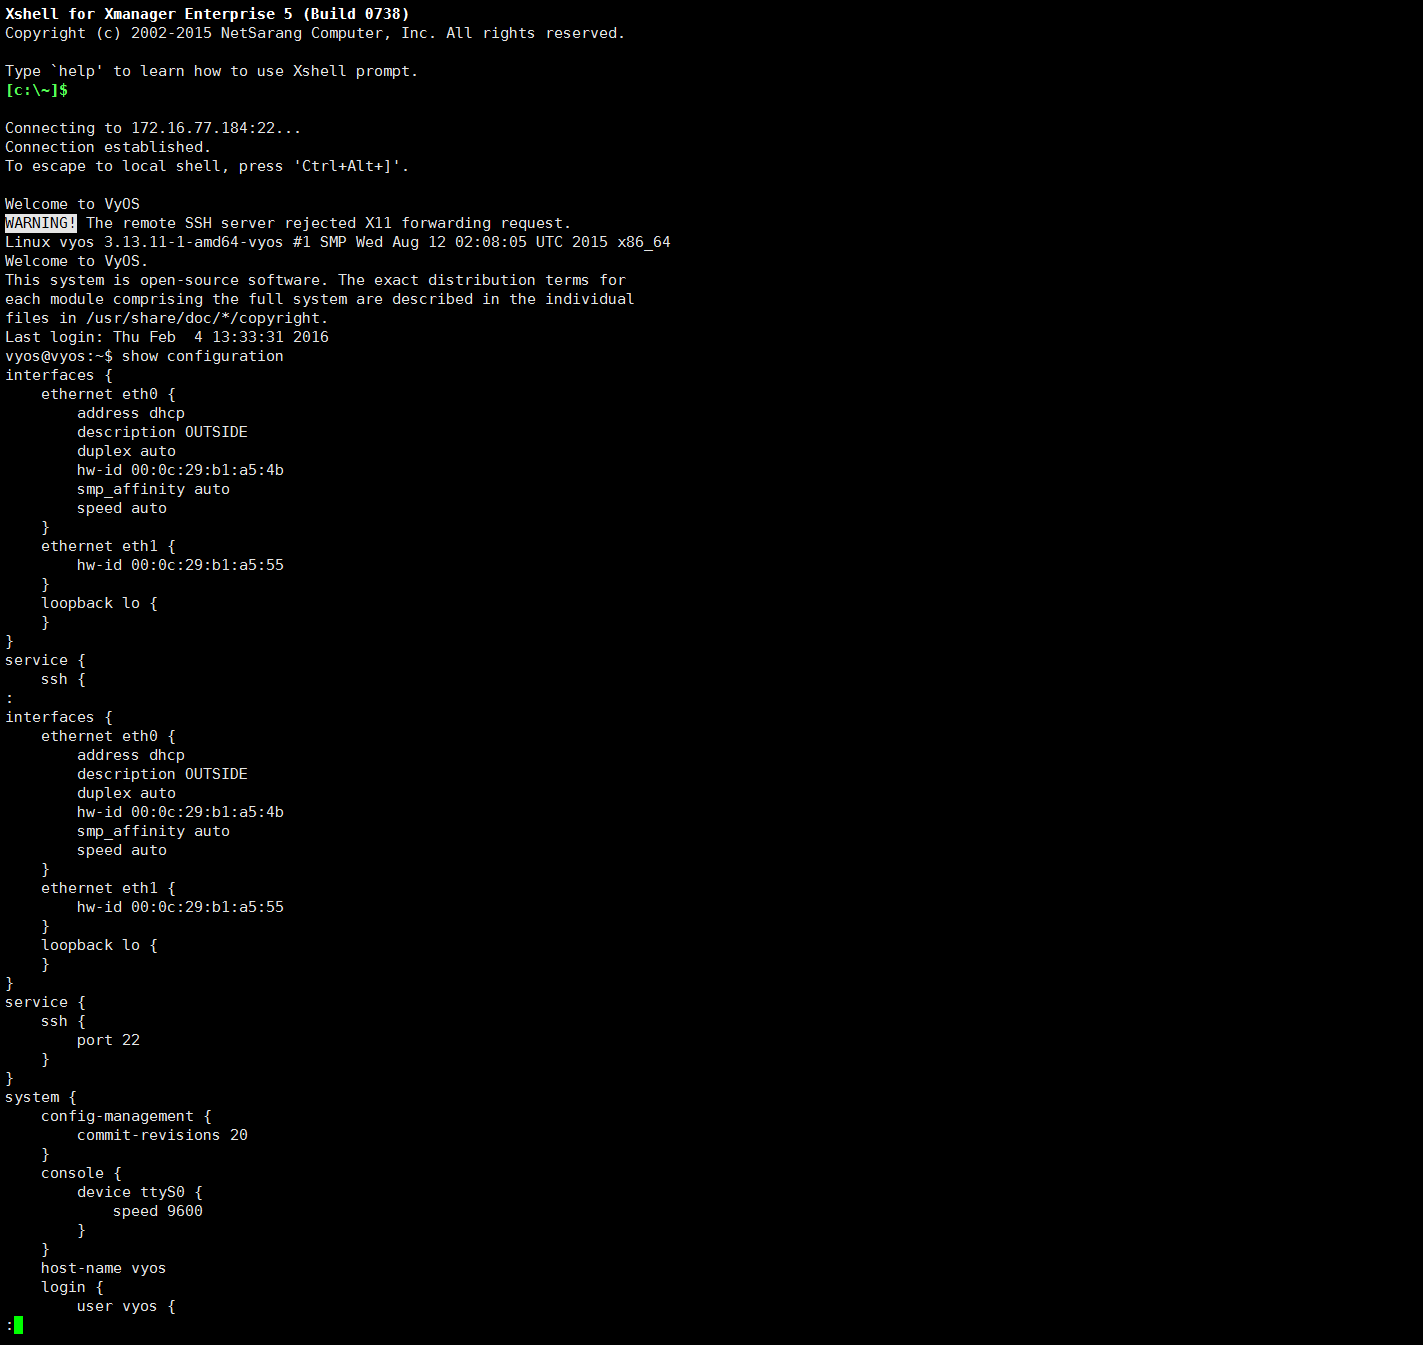
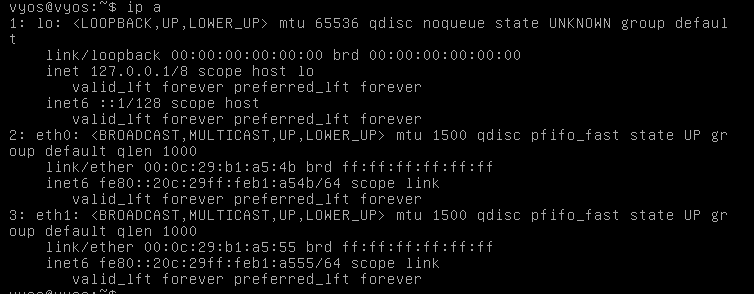
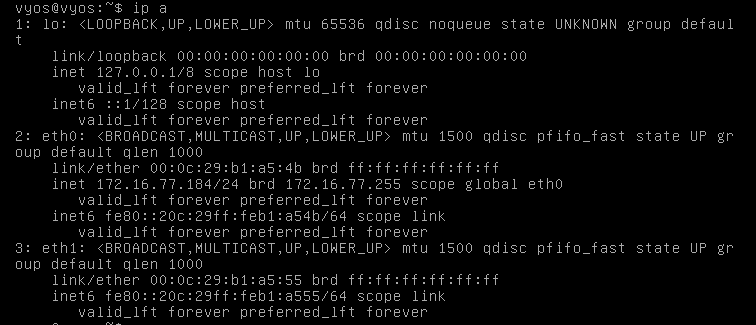
在interfaces中,可以看到目前系统中有三个网络接口,lo、eth0和eth1,eth1并没有配置ip地址。
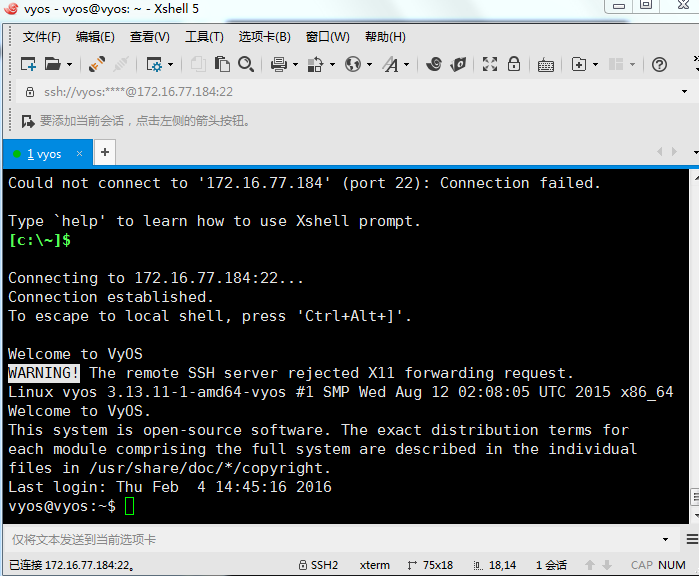
在service中,我启用了ssh,通过xshell连接到VyOS。
在最底下还可以看到console的信息,主机名和登陆的用户名。
最底下的“:”,输入q即可停止查看信息。
在VyOS中,任何配置都应该通过configure模式进行设置,输入configure以进入该模式:
|
1 2 3 4 |
vyos@vyos:~$ configure [edit] vyos@vyos# |
进入configure模式之后,每输入一个命令就会echo一个“[edit]”,指明现正处于编辑模式。在完成你想要的设置后,要commit,再save才能保存配置信息:
|
1 2 3 4 5 6 7 8 |
vyos@vyos# commit No configuration changes to commit [edit] vyos@vyos# save Saving configuration to '/config/config.boot'... Done [edit] |
每次都会保存信息到/config/config.boot,最后我们还要输入exit退出configure模式,变为普通模式:
|
1 2 3 |
vyos@vyos# exit exit |
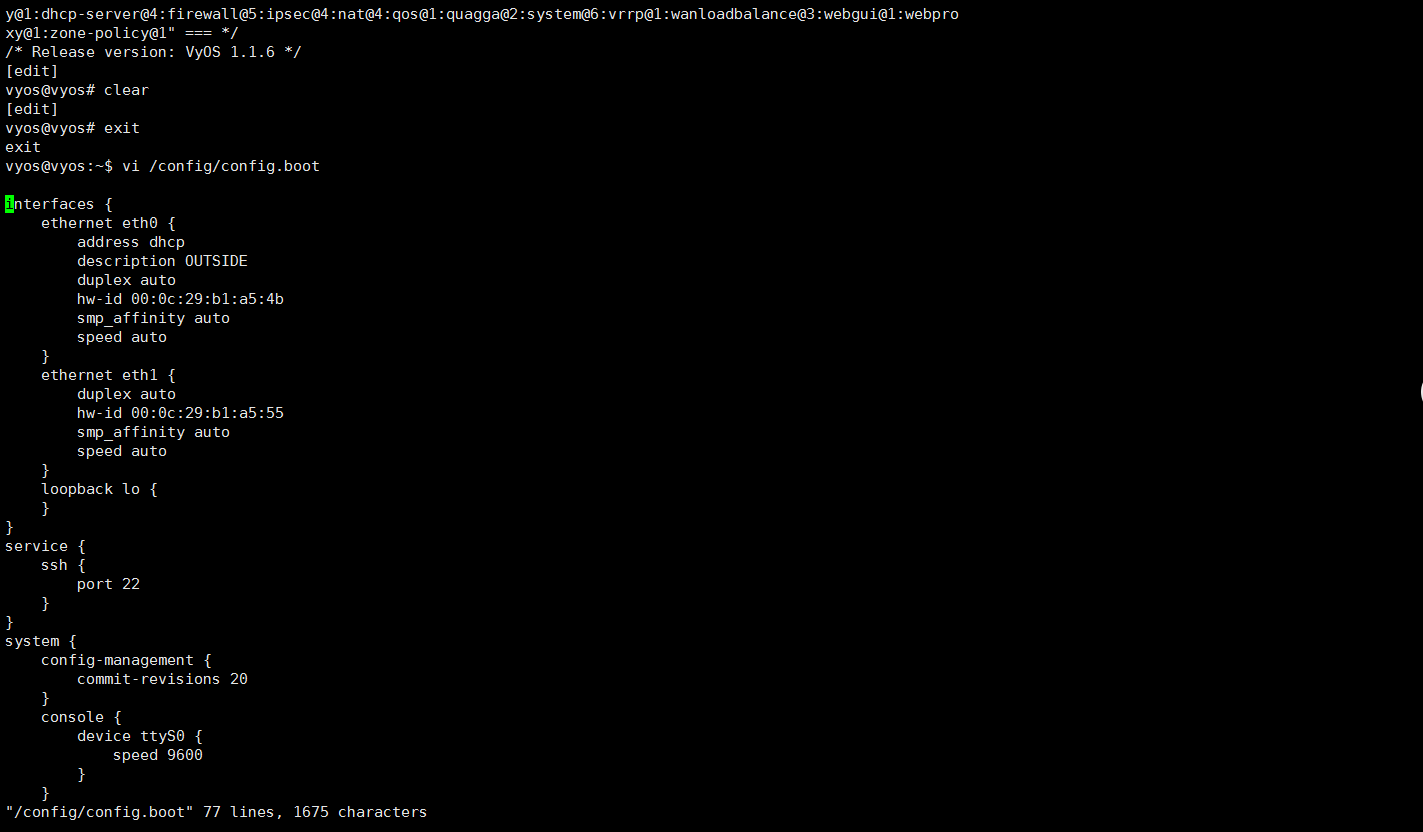
可以查看config.boot文件:
可以输入show configuration commands来查看命令范例:
|
1 2 3 4 5 6 7 8 9 10 11 12 13 14 15 16 17 18 19 20 21 22 23 24 25 26 27 28 29 |
vyos@vyos:~$ show configuration commands set interfaces ethernet eth0 address 'dhcp' set interfaces ethernet eth0 description 'OUTSIDE' set interfaces ethernet eth0 duplex 'auto' set interfaces ethernet eth0 hw-id '00:0c:29:b1:a5:4b' set interfaces ethernet eth0 smp_affinity 'auto' set interfaces ethernet eth0 speed 'auto' set interfaces ethernet eth1 hw-id '00:0c:29:b1:a5:55' set interfaces loopback 'lo' set service ssh port '22' set system config-management commit-revisions '20' set system console device ttyS0 speed '9600' set system host-name 'vyos' set system login user vyos authentication encrypted-password '$1$G3Gocetw$oOs8fJJcyV1bUXg6Hee4g/' set system login user vyos authentication plaintext-password '' set system login user vyos level 'admin' set system ntp server '0.pool.ntp.org' set system ntp server '1.pool.ntp.org' set system ntp server '2.pool.ntp.org' set system package auto-sync '1' set system package repository community components 'main' set system package repository community distribution 'helium' set system package repository community password '' set system package repository community url 'http://packages.vyos.net/vyos' set system package repository community username '' set system syslog global facility all level 'notice' set system syslog global facility protocols level 'debug' set system time-zone 'UTC' |
实践
接下来我们通过一个简单的例子来实践一下:
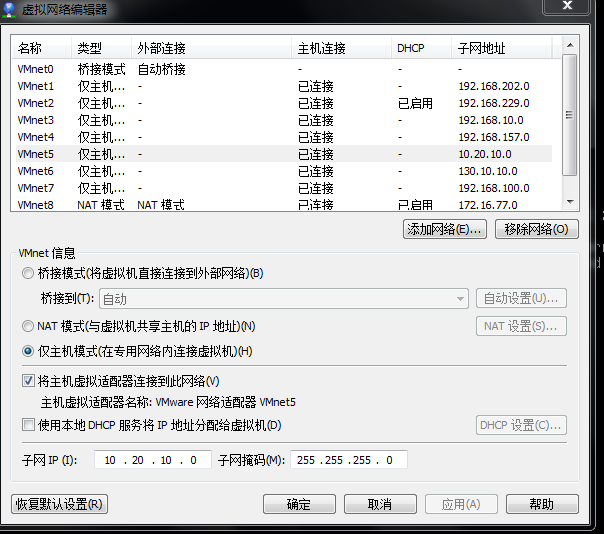
笔者所用的这个VM有两个interface:

网络适配器1是通过vmware的dhcp服务获得IP地址的,而网络适配器2用的是host-only模式,VMnet5的设定可以看下图:
此时VyOS并没有任何IP,无法通过xshell进行操作,我直接在vmware的窗口中操作:
进入configure模式,配置eth0的方法如下:
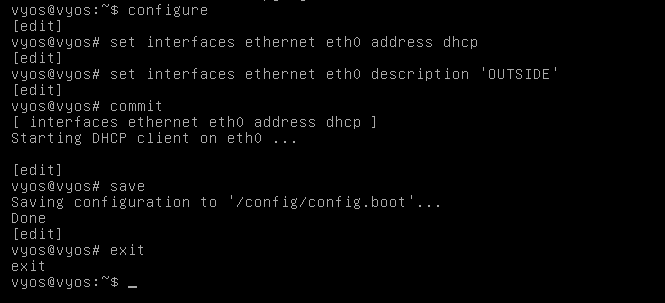
查看设置是否成功:

可以看到eth0已经通过dhcp获得IP地址了。
尝试用xshell连接,成功了:
如果你想删掉某个配置项,把set改为delete就行,最后commit和save。
其他细节
在configure模式中,由于不允许未保存而exit,一般都要commit、save才能exit:
|
1 2 3 4 5 6 7 8 9 10 11 12 13 14 15 16 17 18 19 20 21 22 23 24 25 26 27 28 29 30 31 32 33 34 35 |
vyos@vyos:~$ configure [edit] vyos@vyos# show interfaces ethernet eth0 { address dhcp description OUTSIDE hw-id 00:0c:29:b1:a5:4b } ethernet eth1 { hw-id 00:0c:29:b1:a5:55 } loopback lo { } [edit] vyos@vyos# set interfaces ethernet eth0 duplex auto [edit] vyos@vyos# show interfaces ethernet eth0 { address dhcp description OUTSIDE duplex auto hw-id 00:0c:29:b1:a5:4b } ethernet eth1 { hw-id 00:0c:29:b1:a5:55 } loopback lo { } [edit] vyos@vyos# exit Cannot exit: configuration modified. Use 'exit discard' to discard the changes and exit. [edit] vyos@vyos# |
如果你想强行退出,输入exit discard即可:
|
1 2 3 4 5 6 7 8 9 10 11 12 13 14 15 16 17 18 19 20 |
vyos@vyos:~$ show configuration interfaces { ethernet eth0 { address dhcp description OUTSIDE hw-id 00:0c:29:b1:a5:4b } ethernet eth1 { hw-id 00:0c:29:b1:a5:55 } loopback lo { } } service { ssh { port 22 } } : |
可以看到没有save的话,任何设置都不会变更。
VyOS维护了一份配置变更表,可以通过在configure模式中输入compare [TAB]查看:
|
1 2 3 4 5 6 7 8 9 10 11 12 13 14 15 16 17 18 19 20 21 |
vyos@vyos# compare Possible completions: <Enter> Compare working & active configurations saved Compare working & saved configurations <N> Compare working with revision N <N> <M> Compare revision N with M Revisions: 0 2016-02-04 14:46:06 vyos by cli 1 2016-02-04 14:39:34 vyos by cli 2 2016-02-04 14:37:13 vyos by cli 3 2016-02-04 14:24:41 vyos by cli 4 2016-02-04 13:23:07 root by boot-config-loader 5 2016-02-04 13:02:00 vyos by cli 6 2016-02-04 12:53:53 root by boot-config-loader 7 2016-02-04 12:53:53 root by init [edit] vyos@vyos# compare |
可以通过指定Revision的编号查看变化信息:
|
1 2 3 4 5 6 7 |
vyos@vyos# compare 3 [edit interfaces ethernet eth0] +address dhcp +description OUTSIDE [edit] vyos@vyos# |
以“+”开头的是增加的内容,“-”是删除的内容。
|
1 2 3 4 5 6 7 |
vyos@vyos# compare 2 [edit interfaces ethernet eth0] +description OUTSIDE [edit interfaces ethernet eth1] -description OUTSIDE [edit] |
我们还可以回滚配置,回滚后会重启:
|
1 2 3 4 5 6 7 8 |
vyos@vyos# rollback 1 Proceed with reboot? [confirm][y] [edit] vyos@vyos# Broadcast message from root@vyos (pts/0) (Thu Feb 4 15:13:22 2016): The system is going down for reboot NOW! |
由于回滚到了之前没有设置ip地址的配置,所以xshell连不了
在configure模式中,输入save [TAB]可以看到以下内容:
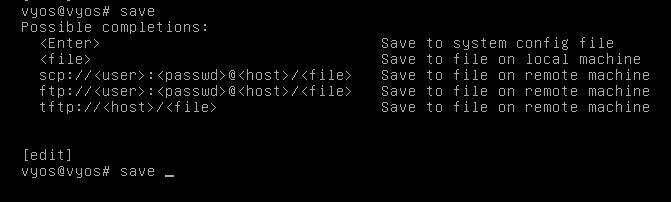
可以通过scp等方式保存数据到远程机器,这大大方便了工程师在自己的电脑上用虚拟机测试好设置后,直接把配置文件发送到远程的当做防火墙或路由的VyOS设备上。
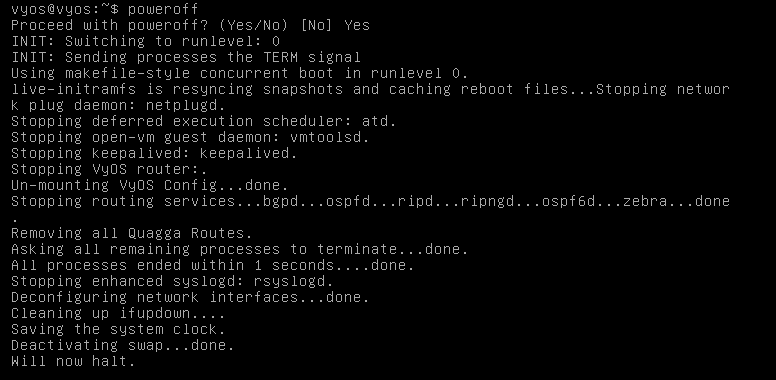
至于关机,要输入poweroff而不是shutdown:
网络接口
在VyOS中可以通过show interfaces查看系统所有的接口:
|
1 2 3 4 5 6 7 8 9 |
vyos@vyos:~$ show interfaces Codes: S - State, L - Link, u - Up, D - Down, A - Admin Down Interface IP Address S/L Description --------- ---------- --- ----------- eth0 172.16.77.184/24 u/u OUTSIDE eth1 - u/u lo 127.0.0.1/8 u/u ::1/128 |
可以看到目前系统中的三个接口,其中eth1没有设置ip地址。
如果想查看单独一个接口的详细信息,可以在show interface后制定类型和接口名:
|
1 2 3 4 5 6 7 8 9 10 11 12 13 14 |
vyos@vyos:~$ show interfaces ethernet eth0 eth0: <BROADCAST,MULTICAST,UP,LOWER_UP> mtu 1500 qdisc pfifo_fast state UP group default qlen 1000 link/ether 00:0c:29:b1:a5:4b brd ff:ff:ff:ff:ff:ff inet 172.16.77.184/24 brd 172.16.77.255 scope global eth0 valid_lft forever preferred_lft forever inet6 fe80::20c:29ff:feb1:a54b/64 scope link valid_lft forever preferred_lft forever Description: OUTSIDE RX: bytes packets errors dropped overrun mcast 22372 233 0 0 0 0 TX: bytes packets errors dropped carrier collisions 24067 208 0 0 0 0 |
每个接口都可以配置一个描述信息和地址:
|
1 2 3 |
set interfaces ethernet eth0 address dhcp set interfaces ethernet eth0 description 'OUTSIDE' |
以太网接口
以太网配置的内容有:
1.speed
2.duplex
3.MAC地址
4.IP地址
5.描述信息
下面根据上面show interfaces的环境,配置一个静态地址:
|
1 2 3 4 5 6 7 8 9 10 11 12 13 14 15 16 17 18 19 20 21 22 23 24 25 26 27 28 29 30 |
vyos@vyos:~$ configure [edit] vyos@vyos# set interfaces ethernet eth1 address '10.20.10.55/24' [edit] vyos@vyos# set interfaces ethernet eth1 description 'INSIDE' [edit] vyos@vyos# set interfaces ethernet eth1 duplex 'auto' Configuration path: [interfaces ethernet eth1 duplex auto] already exists [edit] vyos@vyos# set interfaces ethernet eth1 duplex 'speed' duplex must be auto, half or full Value validation failed Set failed [edit] vyos@vyos# set interfaces ethernet eth1 speed 'auto' Configuration path: [interfaces ethernet eth1 speed auto] already exists [edit] vyos@vyos# commit [edit] vyos@vyos# save Saving configuration to '/config/config.boot'... Done [edit] |
查看是否配置成功:
|
1 2 3 4 5 6 7 8 9 10 11 |
vyos@vyos# show interfaces ethernet eth1 address 10.20.10.55/24 description INSIDE duplex auto hw-id 00:0c:29:b1:a5:55 smp_affinity auto speed auto [edit] vyos@vyos# exit exit |
可以看到我们已经成功设置eth1了,如果配置的内容已经存在,则提示配置已存在。
检查网络配置文件,其实接口信息并没有设置在这里,而是在VyOS启动时自动从config.boot加载设置:
|
1 2 3 4 5 6 7 8 |
vyos@vyos:~$ cat /etc/network/interfaces # Used by ifup(8) and ifdown(8). See the interfaces(5) manpage or # /usr/share/doc/ifupdown/examples for more information. # The loopback network interface auto lo iface lo inet loopback |
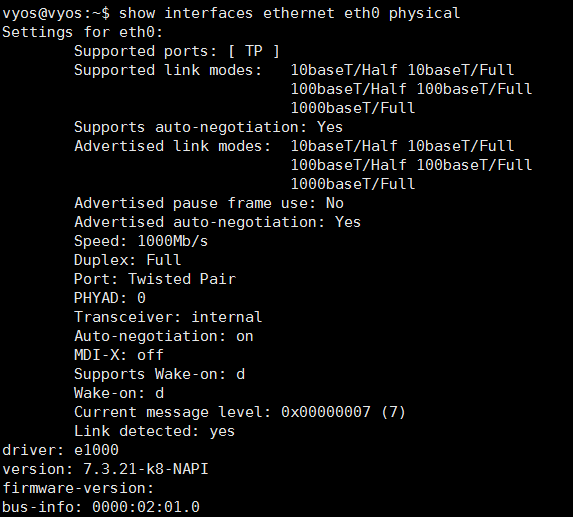
VyOS还提供了额外的命令用来查看接口的物理信息(这是vmware虚拟网卡的信息):
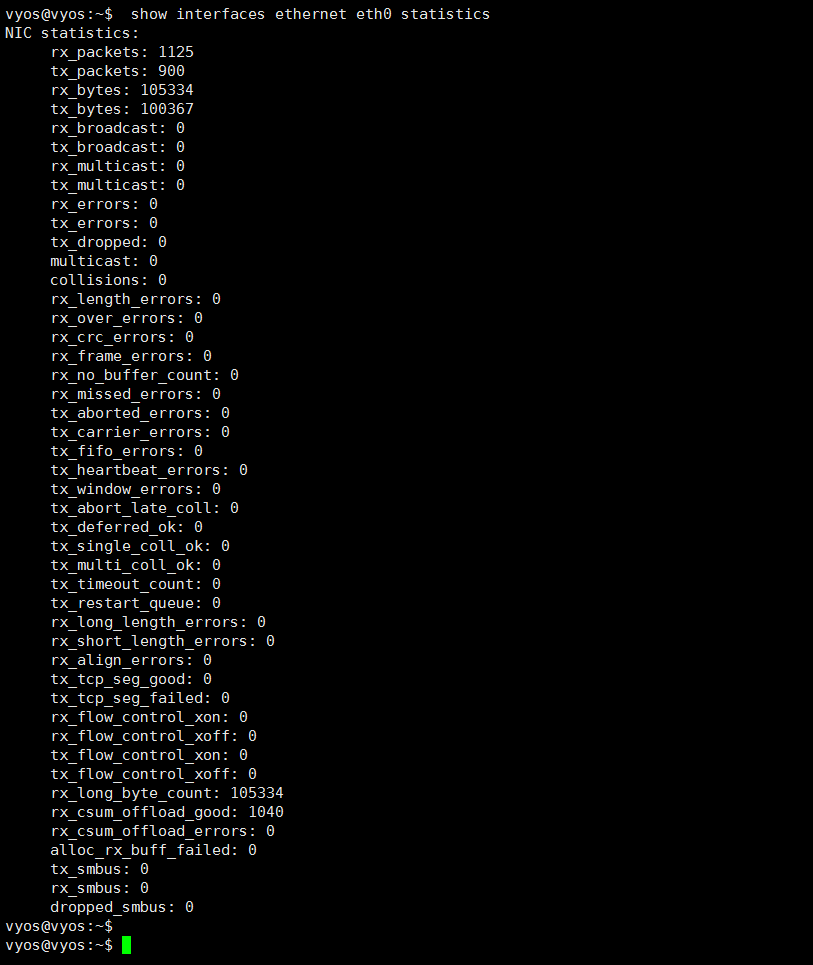
如果想看接口的统计信息,可以输入show interfaces ethernet <接口> statistics
VLAN接口
在VyOS中提供了对802.1q VLAN的支持,通过输入set interfaces ethernet vif 实现。
|
1 2 3 4 5 6 7 |
vyos@vyos:~$ configure [edit] vyos@vyos# set interfaces ethernet eth1 vif 100 description 'VLAN 100' [edit] vyos@vyos# set interfaces ethernet eth1 vif 100 address '10.20.10.100/24' [edit] |
可以看到将会增加下面的设置:
|
1 2 3 4 5 6 7 8 9 10 11 12 13 |
vyos@vyos# show interfaces ethernet eth1 address 10.20.10.55/24 description INSIDE duplex auto hw-id 00:0c:29:b1:a5:55 smp_affinity auto speed auto +vif 100 { + address 10.20.10.100/24 + description "VLAN 100" +} [edit] |
保存退出configure模式后,查看接口信息:
|
1 2 3 4 5 6 7 8 9 10 |
vyos@vyos:~$ show interfaces Codes: S - State, L - Link, u - Up, D - Down, A - Admin Down Interface IP Address S/L Description --------- ---------- --- ----------- eth0 172.16.77.184/24 u/u OUTSIDE eth1 10.20.10.55/24 u/u INSIDE eth1.100 10.20.10.100/24 u/u VLAN 100 lo 127.0.0.1/8 u/u ::1/128 |
在VyOS中,VLAN接口会以name.vlan_id的格式显示。
Bridge
VyOS提供了Bridge,可以让两个接口桥接实现二层交换,下面会创建一个bridge,同时设置VLAN(备注,如果按照前面的设置了VLAN接口,需要删除才能做下面的实验)。
|
1 2 3 4 5 6 7 8 9 |
vyos@vyos:~$ configure [edit] vyos@vyos# set interfaces bridge 'br100' [edit] vyos@vyos# set interfaces ethernet eth1 vif 100 bridge-group bridge br100 [edit] vyos@vyos# set interfaces bridge br100 address '10.20.10.100/24' [edit] |
bridge可以设IP地址
启用STP:
|
1 2 3 |
vyos@vyos# set interfaces bridge br100 stp true [edit] |
保存退出后,可以看到这个bridge的信息:
|
1 2 3 4 |
vyos@vyos:~$ show bridge bridge name bridge id STP enabled interfaces br100 0000.000c29b1a555 no eth1.100 |
输入show bridge spanning-tree查看STP的设置:
|
1 2 3 4 5 6 7 8 9 10 11 12 13 14 15 16 17 18 19 20 21 |
vyos@vyos:~$ show bridge br100 spanning-tree br100 bridge id 0000.000c29b1a555 designated root 0000.000c29b1a555 root port 0 path cost 0 max age 20.00 bridge max age 20.00 hello time 2.00 bridge hello time 2.00 forward delay 0.00 bridge forward delay 0.00 ageing time 300.00 hello timer 0.21 tcn timer 0.00 topology change timer 0.00 gc timer 21.01 flags eth1.100 (1) port id 8001 state forwarding designated root 0000.000c29b1a555 path cost 4 designated bridge 0000.000c29b1a555 message age timer 0.00 designated port 8001 forward delay timer 0.00 designated cost 0 hold timer 0.00 flags |
想查看网桥上MAC地址的记录,可以输入show bridge macs:
|
1 2 3 4 |
vyos@vyos:~$ show bridge br100 macs port no mac addr is local? ageing timer 1 00:0c:29:b1:a5:55 yes 0.00 |
端口Bonding
通过bonding,可以让多个物理接口变为一个逻辑接口,以提高网络性能。
先设定一个新的bond接口:
|
1 2 |
vyos@vyos# set interfaces bonding bond0 description '0bond' |
设定hash_policy,VyOS有三种policy:
1.layer2:用MAC地址生成hash
2.layer2+3:用MAC和IP地址生成hash
3.layer3+4:用IP地址和端口生成hash
这里直接用layer2:
|
1 2 |
vyos@vyos# set interfaces bonding bond0 hash-policy 'layer2' |
设定bond mode,有多种mode:
|
1 2 3 4 5 6 7 8 9 10 11 12 13 |
vyos@vyos# set interfaces bonding bond0 mode <TAB> Possible completions: 802.3ad IEEE 802.3ad Dynamic link aggregation (Default) active-backup Fault tolerant: only one slave in the bond is active broadcast Fault tolerant: transmits everything on all slave interfaces round-robin Load balance: transmit packets in sequential order transmit-load-balance Load balance: adapts based on transmit load and speed adaptive-load-balance Load balance: adapts based on transmit and receive plus ARP xor-hash Load balance: distribute based on MAC address |
最后把接口加到我们的bond0中:
|
1 2 3 4 5 6 7 8 9 |
vyos@vyos# set interfaces ethernet eth0 bond-group 'bond0' [edit] vyos@vyos# set interfaces ethernet eth0 description 'member of bond0' [edit] vyos@vyos# set interfaces ethernet eth1 bond-group 'bond0' [edit] vyos@vyos# set interfaces ethernet eth1 description 'member of bond0' [edit] |
保存退出configure模式之后就可以通过下面的命令查看详细信息:
|
1 2 |
vyos@vyos:~$ show interfaces bonding |
你无法修改这个bond0的duplex等参数,但是可以进行设定IP地址等操作。
结语
本文通过实践,先详细地介绍了VyOS的使用方面的细节。实际上,VyOS和Cisco IOS等系统其实也差不多,熟悉传统设备的人员应该也能快速上手。后面的内容对 VyOS中几个常用的interfaces进行了介绍,希望能对那些对VyOS有兴趣的研究者有所帮助。在后面的文章中,会通过实验对VyOS的功能进行应用,进一步体验VyOS的魅力。
参考资料:
http://vyos.net/wiki/User_Guide
作者简介:何智刚,2015至今,现为广东的一名在校高三学生,在学习之余,主要研究Docker,OpenStack,SDN,对各种领域都有所涉猎,目标是迈向full stack