作者简介:刘敬一,盛科网络SDN交换机产品线测试主管
之前分享过《如何用postman控制ODL查看和下发流表》。但是在实际应用中,经常会遇到需要下发大量流表的情况。ODL的bulk-o-matic组件可以帮助我们实现这个需求。
准备工作
- Ubuntu 14.04.4 LTS
- java version “1.8.0_91”
- distribution-karaf-0.5.2-Boron-SR2
- Curl & Postman
安装
- 解压distribution-karaf-0.5.2-Boron-SR2.zip后启动ODL,安装下列组件
1234567opendaylight-user@root>feature:install odl-restconfopendaylight-user@root>feature:install odl-l2switch-switchopendaylight-user@root>feature:install odl-mdsal-apidocsopendaylight-user@root>feature:install odl-mdsal-allopendaylight-user@root>feature:install odl-openflowplugin-app-bulk-o-maticopendaylight-user@root>feature:install odl-dlux-allopendaylight-user@root>
- 确认组件安装成功:
1234opendaylight-user@root>feature:list | grep "bulk-o-matic"odl-openflowplugin-app-bulk-o-matic | 0.3.2-Boron-SR2 | x | openflowplugin-0.3.2-Boron-SR2 | OpenDaylight :: Openflow Plugin :: Application -odl-openflowplugin-app-bulk-o-matic-he | 0.3.2-Boron-SR2 | | openflowplugin-he-0.3.2-Boron-SR2 | OpenDaylight :: Openflow Plugin :: app bulk flow oopendaylight-user@root>
- 连接OpenFlow换机,查看交换机上的流表:
12345DUT1# ovs-ofctl dump-flows br0 -O openflow13OFPST_FLOW reply (OF1.3) (xid=0x2):cookie=0x2b00000000000000, duration=1551.307s, table=0, n_packets=0, n_bytes=0, priority=100,dl_type=0x88cc actions=CONTROLLER:65535cookie=0x2b00000000000000, duration=1551.309s, table=0, n_packets=0, n_bytes=0, priority=0 actions=dropDUT1#
- 在ODL的WebUI上可以看到连上的交换机,并获取OVS的dpid=openflow:128983239877。
准备xml文件
- 创建一个文件test.xml,写入下面内容:
12345678910111213141516171819202122232425262728293031323334353637383940414243444546474849505152535455565758596061626364656667686970717273747576777879<?xml version="1.0" encoding="UTF-8" standalone="no"?><input xmlns="urn:opendaylight:bulk-flow:service"><bulk-flow-ds-item><flow-name>test_1</flow-name><flow-id>31#-0</flow-id><node xmlns:inv="urn:opendaylight:inventory">/inv:nodes/inv:node[inv:id="openflow:128983239877"]</node><barrier>false</barrier><strict>false</strict><hard-timeout>0</hard-timeout><idle-timeout>0</idle-timeout><priority>980</priority><table_id>0</table_id><cookie>16</cookie><cookie_mask>255</cookie_mask><match><ethernet-match><ethernet-type><type>2048</type></ethernet-type></ethernet-match><ip-match><ip-protocol>6</ip-protocol></ip-match><tcp-destination-port>80</tcp-destination-port><in-port>openflow:128983239877:1</in-port></match><instructions><instruction><order>0</order><apply-actions><action><order>0</order><output-action><output-node-connector>openflow:128983239877:2</output-node-connector></output-action></action></apply-actions></instruction></instructions></bulk-flow-ds-item><bulk-flow-ds-item><flow-name>test_2</flow-name><flow-id>32#-0</flow-id><node xmlns:inv="urn:opendaylight:inventory">/inv:nodes/inv:node[inv:id="openflow:128983239877"]</node><barrier>false</barrier><strict>false</strict><hard-timeout>0</hard-timeout><idle-timeout>0</idle-timeout><priority>980</priority><table_id>0</table_id><cookie>16</cookie><cookie_mask>255</cookie_mask><match><ethernet-match><ethernet-type><type>2048</type></ethernet-type></ethernet-match><ip-match><ip-protocol>6</ip-protocol></ip-match><tcp-destination-port>443</tcp-destination-port><in-port>openflow:128983239877:1</in-port></match><instructions><instruction><order>0</order><apply-actions><action><order>0</order><output-action><output-node-connector>openflow:128983239877:2</output-node-connector></output-action></action></apply-actions></instruction></instructions></bulk-flow-ds-item></input>
下发流表
- 可以使用curl进行下发流表:
|
1 2 3 4 5 6 7 8 9 10 11 12 13 14 15 16 17 18 19 20 21 22 23 24 25 |
centec@ubuntu-onos-80:~/Applications$ curl -v -H "Expect:" -H "Content-Type: application/xml; charset=UTF-8" -X POST -d @test.xml http://admin:admin@10.10.11.80:8181/restconf/operations/sal-bulk-flow:add-flows-ds * Hostname was NOT found in DNS cache * Trying 10.10.11.80... * Connected to 10.10.11.80 (10.10.11.80) port 8181 (#0) * Server auth using Basic with user 'admin' > POST /restconf/operations/sal-bulk-flow:add-flows-ds HTTP/1.1 > Authorization: Basic YWRtaW46YWRtaW4= > User-Agent: curl/7.35.0 > Host: 10.10.11.80:8181 > Accept: */* > Content-Type: application/xml; charset=UTF-8 > Content-Length: 2533 > * upload completely sent off: 2533 out of 2533 bytes < HTTP/1.1 200 OK < Set-Cookie: JSESSIONID=1l76a46cmwjooy3b6r9bc2g7u;Path=/restconf < Expires: Thu, 01 Jan 1970 00:00:00 GMT < Set-Cookie: rememberMe=deleteMe; Path=/restconf; Max-Age=0; Expires=Tue, 23-May-2017 00:45:23 GMT < Content-Type: application/yang.operation+json < Content-Length: 0 * Server Jetty(8.1.19.v20160209) is not blacklisted < Server: Jetty(8.1.19.v20160209) < * Connection #0 to host 10.10.11.80 left intact centec@ubuntu-onos-80:~/Applications$ |
- 或者 使用postman下发,将test.xml的内容,复制粘贴到postman的body,send POST。
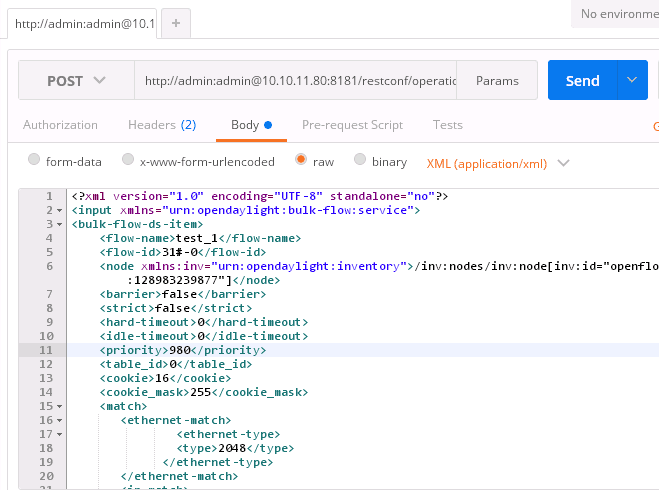
- 效果相同,都会添加xml描述的两条流表:
1234567DUT1# ovs-ofctl dump-flows br0 -O openflow13OFPST_FLOW reply (OF1.3) (xid=0x2):cookie=0x10, duration=1.6s, table=0, n_packets=0, n_bytes=0, priority=980,tcp,in_port=1,tp_dst=80 actions=output:2cookie=0x10, duration=1.598s, table=0, n_packets=0, n_bytes=0, priority=980,tcp,in_port=1,tp_dst=443 actions=output:2cookie=0x2b00000000000000, duration=1562.955s, table=0, n_packets=0, n_bytes=0, priority=100,dl_type=0x88cc actions=CONTROLLER:65535cookie=0x2b00000000000000, duration=1562.957s, table=0, n_packets=0, n_bytes=0, priority=0 actions=dropDUT1#
删除流表
- 依然使用curl或是postman来send DELETE:
*查看交换机,上步添加的指定流表被删除了。1http://10.10.11.80:8181/restconf/config/opendaylight-inventory:nodes/node/openflow:128983239877/flow-node-inventory:table/012345DUT1# ovs-ofctl dump-flows br0 -O openflow13OFPST_FLOW reply (OF1.3) (xid=0x2):cookie=0x2b00000000000000, duration=1551.307s, table=0, n_packets=0, n_bytes=0, priority=100,dl_type=0x88cc actions=CONTROLLER:65535cookie=0x2b00000000000000, duration=1551.309s, table=0, n_packets=0, n_bytes=0, priority=0 actions=dropDUT1#
扩展
- 上面举例的xml中包含两条流表,很容易扩展到添加更多的流表,每条流表放在
和 之间即可。 - 添加流表的问题,就转换成写xml文件的问题,这个大家就可以各显神通了。
补充说明
- 我也曾经尝试使用更习惯的JSON来写test.json,可是发现和用yangui一样,都会报错;
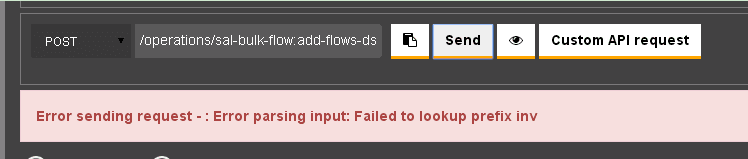
- 用谷歌也没有搜出有用的信息,怀疑是ODL的bug;
- 如果哪位知道如何解决,还望不吝赐教。